It's half term week here, so the blog will be quiet for a while yet. I just popped in slightly fuming from my shopping trip today. The Elf son's trousers suddenly all looked awfully tight/short/unfitting. He has grown again! And I have not held a keen enough eye on this, so have not prepared by buying fabric to make clothes for him. This is my new goal, try to keep up with my family's sartorial needs.
I had a mental shopping round in my head and decided to head slightly South from where we live to a bigger town to find a pair of trousers for him. I deliberately did not make a bee-line for a big supermarket, slightly closer by, oh no. I suspect the supermarket has very bad practices on its supply chain.
You know what? There was not one shop selling clothes in his size! OK, there was, but that was only school uniforms. We ended up in the said supermarket to buy one pair of jeans to save our butts for just now. That pair cost £7. I would have happily paid three times the price, if I had been assured that there had not been exploitation down the line. Because for £7 there has been, that's for sure. Don't feel proud of myself buying them and promise to keep better eye on his growing habits from now on.
Coletterie has an interesting book review and interview of the author on the same subject.
Have a great weekend!
Friday, 22 February 2013

Tuesday, 12 February 2013
Re-purposing three sets of draws

I love to see other people's houses, how they live, have decorated and generally organised their space to reflect the life they lead or not. I especially enjoy seeing other people's workspaces. I thought it fair to show some of my workspace.
When I was putting my workroom together, I tried to do it with smallest amount of money and one of the strategies I employed was to look what I already had and possibilities of changing things. I have had these set of small draws from IKEA for yonks. They have been used a lot and then stored for a good while, when there was no need for them. They were originally untreated birch veneer. Under first round of service they were stained brown and for this project I painted them white with eggshell wood paint.
The draw fronts I decorated with some of my favourite fabrics, which I fastened with PVA glue. I could have given the fronts maybe another layer of glue to make them more varnished. I love the patterns and the colours and had an awful time deciding whether I should use these blue hues or go for red ones. I am still occasionally tempted to change the colours.


The green and turquoise knobs came from IKEA and were very cheap. I drilled holes on the draw fronts and used scissors to make a hole into the fabric. HINT: do not try to drill through the fabric as the threads will go round the drill bit and it will end in tears.
I also added castors to make the draws easy to move around. I think that I used glue, possibly "No more nails" for fastening the three "sets" onto each other.

Now it is easy for me to reach for my colourful thread and doll hair yarn

neutral thread, bits and bobs and vintage lace,

my needles, bobbins and measuring tapes.

And best of all, it is all neatly out of sight when not in use.
Thursday, 7 February 2013
Craft Kiosk opening

Trat-dat-dat-daaah....My Craft Kiosk is open! LOOK, there is a tab there where you can see my current overflow of inspiration for sale.
I have had people ask me if I sell any of my crafts. Until now I have told them to tell me what they want to have and I will make it as a commission. This is still what I do. In addition I have added a tab on this blog, where you can see what I have kicking around in my hut. These things are made and ready to go, if you wish to purchase.
The small items have p&p in 2nd class UK mail included. Anything else and you have to mail me, so I can calculate.
PS.The picture is one of the pencil cases for sale.
Saturday, 2 February 2013
Tailored shirt and trousers and the art of making slowly

TA-DAH!!! I managed it! Hallelujah, I sewed a pair of trousers and a shirt for Elf Husband. I started with the trousers as they were more needed and I felt more comfortable making them. I have made numerous trousers for myself and others too. First I thought I would draft the pattern myself. I soon gave up on this idea as he did not have well fitting trousers which I could have taken apart in order to use as a base for the pattern. I ended up using Kwik Sew pattern nr.2860.
I was careful measuring the Husband and altered the pattern accordingly, but I still had to rip off the waistband and redo the whole upper part to make it shorter and better fit. IF I had bothered making a muslin, this problem would have been noticed.
I know how to sew trousers, but as I have never made a pair of gents' tailored ones I decided to do as they say in the instructions. Either I totally misunderstood the instructions or there is a funny kink in the part of sewing the zip on. I had to take one side apart and do it again like I would have.I am very proud of the back pockets. I have made placket pockets before, but only in bags.

You get pictures here with the husband inside the clothes as he was so sweet as to model for me. Throwing silly poses, of course, but that goes with the territory.

I also embarked on making a shirt. I bought the pattern at the same time with the trousers. We needed just a basic shirt pattern and Kwik Sew 3883 fitted the bill perfectly. I have never ever made a formal shirt before. So I just went with the instructions and took it as education. To my great delight sewing a shirt was not difficult. It was long winded for sure, but not difficult. The only hitch with the pattern was that the cuffs didn't fit. Note to myself: fasten the sleeve folds first when ready to sew the cuffs on. Just adjusting the folds was enough to rectify the problem.
I was dreading most the collar and the yoke, but both went on surprisingly easily.

Now to the art of making slowly. I have tendency to rush to the end of project despite eyes watering from tiredness, ears humming and back aching. I made a conscious decision NOT to this time. For example I cut the shirt one day and did not do any more. I also stopped after my "prime hours" and did something else. It was good. Far fewer stupid mistakes were done. OK, OK. I did sew one of the sleeves on the wrong side and then proceeded to finish it off with a felled seam. It was a bit of a job to pick the stitches. But this was merely a "normal", done in the joy of sewing type of mistake.

Does it pay off making trousers and shirts? Well, that depends how you look at it. You can certainly buy both for the price of the fabric I used, although might be pushed with these particular trousers. I bought the fabric here. They have a limited choice, but if you find what you need, it is really good quality stuff to very reasonable prices.
When I am thinking about sewing versus buying, I do not compare with the cheapest. I actively avoid the cheapest clothes shops. Knowing what material costs, even in whole sale, and the amount of work that goes into making a garment, I know someone somewhere along the supply chain has not been paid fairly. I vote with my pounds and don't shop those clothes. It can be really difficult to find out where a piece of fabric was made, so it might have an uncertain pedigree. I know that the trouser fabric is British, the shirt fabric was bought here and I cannot tell the origins of it. So although I cannot say that all unethical practices are avoided, I feel I have limited the damage.
The workmanship going into clothes I make is far superior to the cheap clothing. Like Elf Husband said:"I could wear the shirt inside out and nobody would notice!" The shirt is made of woven flannel check, not printed, so looks exactly same both sides. The pattern did not call for felled seams, that was my own decision.


You can find clothes which are well made also in the shops, but they are often way out of our price range. It is cheaper to make quality clothing than buy it. It also gives us a different relationship to clothes and how we take care of them when we know how long it took to make them.
All in all I think that as a first attempt I can be satisfied with my efforts!
Wednesday, 30 January 2013
Keeper of memories

Keeping things, de-cluttering, mementoes...That is all very topical for many of us, judging by the blog posts I have read recently. I think of myself as quite a good at de-cluttering. But that does not mean that there is not room for improvement.
I think that even for a hardened de-clutter some things are more difficult to let go than others. That is gifts or things from people who mean a lot to us. I think if the person who gave the thing or owned it first is also dead, it becomes even harder.
I read a very moving posting about a blogger (in Danish) who realised that she had been hanging to a bowl which she had got from one of her grandmothers. This was the only thing she had from the lady, who had passed away. The bowl never really fitted into her house and was difficult to store due to its size. Recently she realised that her memories of the wonderful grandma were not dependent on the bowl; she had them and nobody could take them away. Neither was there a little bit of grandma magically hiding in the bowl, so she decided to let it go.
I have had similar experiences and have been able slowly to let go of things I would never use. Now...I am going to up the game a bit for all the crafters: What do you do when you have a piece of beautiful handiwork, which does not get used? For me it is far, far harder to let go of something if it was made by my grandma than if it was merely bought and used by her. So I have a bit of a textile treasure problem: What to do when you are not going to use it?
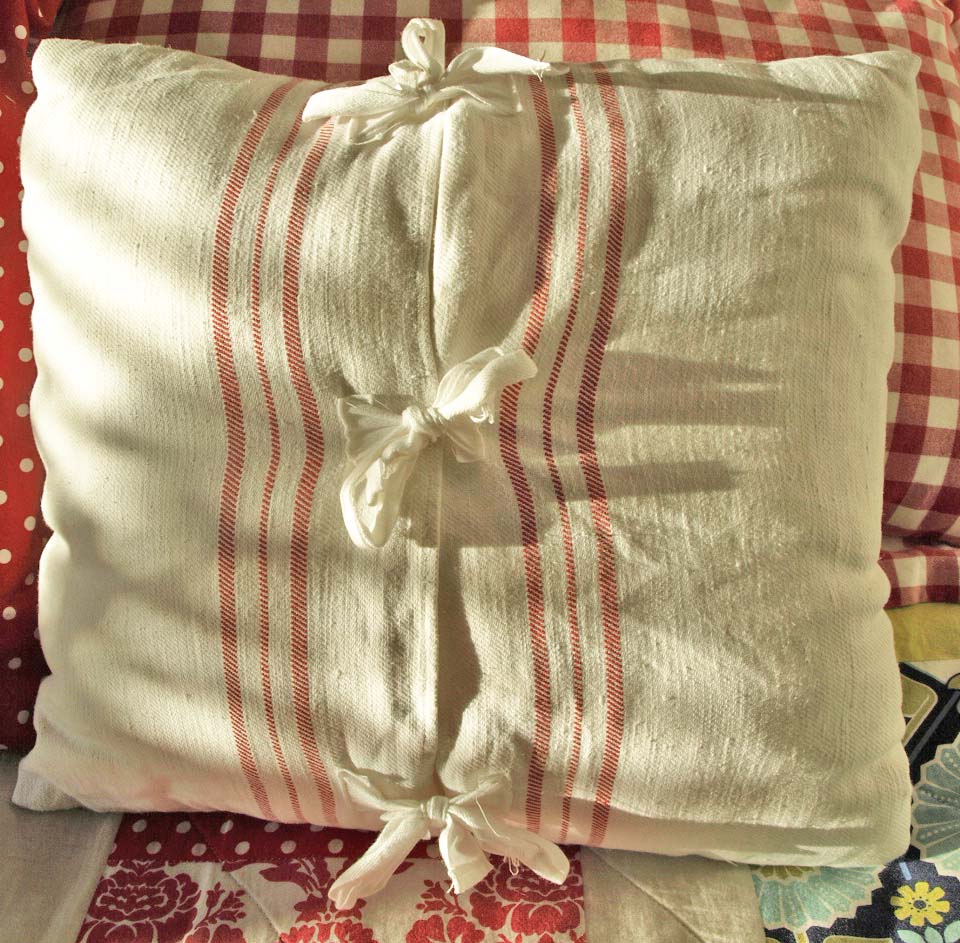
This is what I have done lately. I have tried to think of an alternative use for the material. Here is a cushion I made out of a dishcloth. Ok, it might not be the height of refinement, but the linen it is made of is quality you will have hard time to find today. (Hence I cannot bring myself to use it to its original purpose!). I had one of those days when I really yearned to make something in hand, so both the patchwork and embroidery is entirely hand sewn.

The original monogram is intact and beautiful

The back got tied in a primitive style echoing the loop the teatowel used to have.
These cushions have been made by my relatives and are now mine. They were cushions and I like them as that. The black one used to be on my greatgrandmother's bed. It is either made by her or my grandmother, I do not know for sure. It is actually made of old suiting, the back shows it clearly, having been put together from either leg or arm of a suit, probably to get the last use of expensive fabric. I use it even if the embroidery has started unravelling as you see in the first picture of this post. I rather use and enjoy it than "archive" it in a cupboard.

I had also a sateen apron with beautiful embroidery of my grandma's. I knew I would never use it, but could not make myself to throw it away either. So now it is a sofa cushion.

As the apron had a little pocket, I attached that on the black cotton back of the cushion to remind me of the apron.

Have you re-purposed treasured things lately?
Tuesday, 29 January 2013
Juicy baby quilt

This was the other reason why I was so quick out of my bed last week; a baby quilt commission in juicy colours.
It is again the "Chinese Coin" model and measures approximately 105cmX117cm. The front is pieced from various quilting cottons and the back is flannel.


I machine pieced and quilted and then finished off by hand sewing the binding on
the back. This time I quilted with a wavy free motion in yellow. I like
the result.


I can hand quilt and quite enjoy it, but I cannot see that you can sell those pieces, if you want to have a salary for yourself. Or I should find some very wealthy clients for those ones...I guess for me they will always be pieces made for my family and friends.
Sunday, 27 January 2013
Bunny Baby

Who is napping on my bed?
Oh it's you! This Bunny Baby was made as a commission and was obviously needing a rest before its long journey to Canada.

The idea is an old one; dolls with soft bodies and plastic face and sometimes hands have existed long. I have replaced the plastic bits with Waldorf type head and hands. In Maricristine Sealey's book "Making Waldorf Dolls" she shows something similar, but not quite the same. This is naturally my own pattern.
The animal ears are also a used theme. I can remember seeing at least bunny ears and teddy ears on bought dolls. I offer choice of bunny, mouse, teddy, cat and "beagle" ears. You can have the baby without ears as well. It looks quite sweet with a pointy hood instead.
This is the doll which is more suited for a younger child. Very young children like to cuddle soft toys, throw them about, cart them around in buggies, bags and buckets. There is none or almost no interest in changing clothes for a dolly. To start with the fine motor skills won't allow for this anyway.
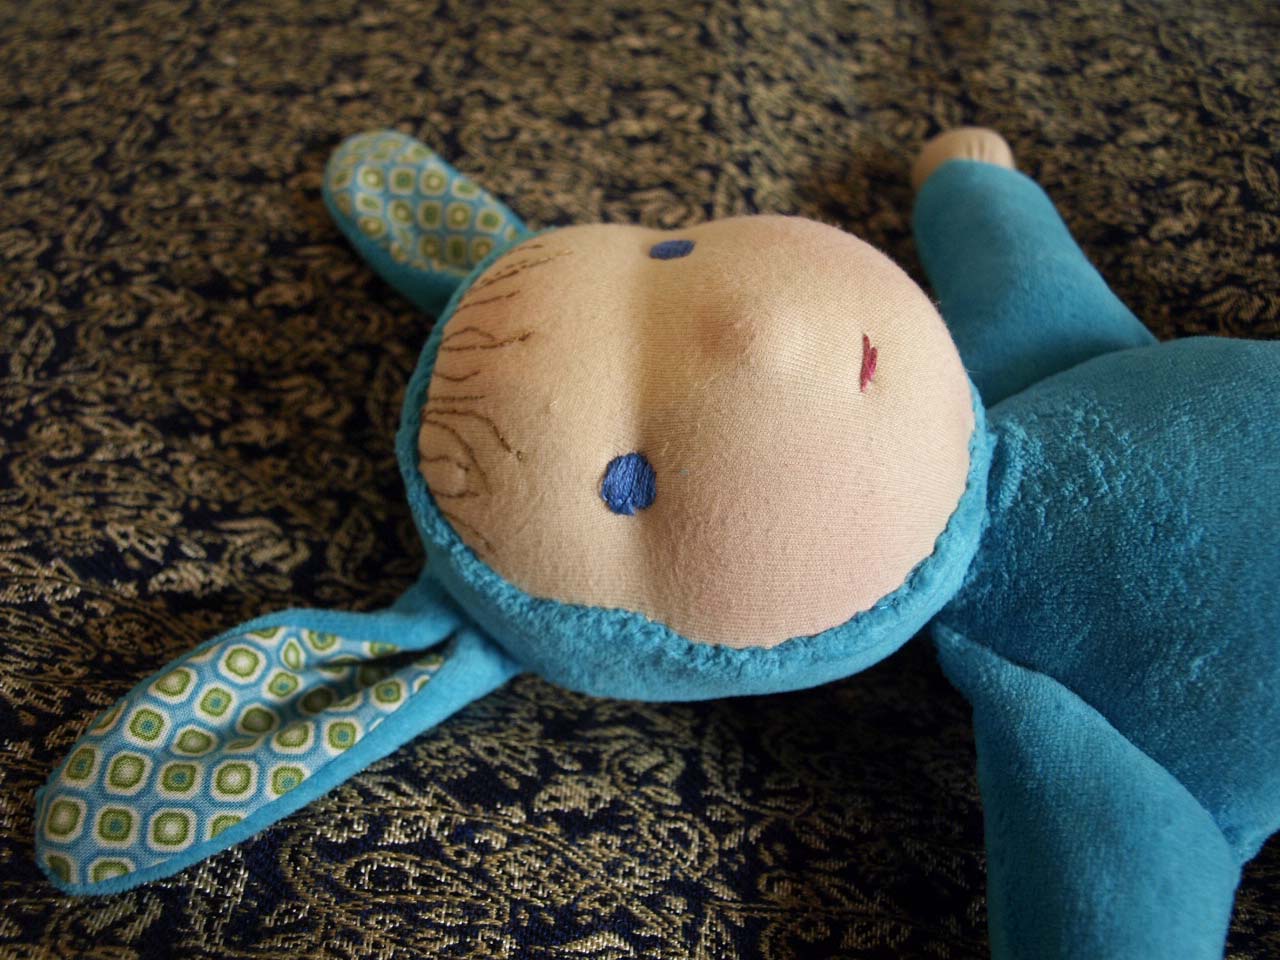
The doll's face is made from the same skin fabric, 100% cotton interlock jersey, as the other dolls. The features are embroidered as are the wisps of the hair to make the dolly more durable and safe for the smallest. It would be quite an experience for a little one who is still in his/her mouthing period to get a mouth full of mohair yarn. It is possible to make a little fringe of cotton, but it is not as durable option as the embroidered one.
The filling is sheep wool, just like the other dolls. And as I just cannot make a doll without ANY clothes, she got a little skirt on. It has an elastic waist, so it is an easy "starter" piece of clothing both for taking off (which happens first) and putting back on. A Boy Bunny would wear elasticated short trousers.

The Bunny Baby is wearing a onesie made of high cotton content velour in colour choice of the customer.
This Bunny Baby ate lots of food before the travel, so her tummy is nice and round. She is ready for hugs and cuddles with her new dolly mummy.

She needed something to travel in apart from the normal packaging, so she got her own tote to travel in comfort.

Have you made anything inspiring for the younger children?
Thursday, 24 January 2013
Crocheted cosiness

I am not able to churn projects at the pace I am posting them, but I have some backlog from the last year. This week I have actually finished two commissions, which I will show you later. I have been hopping out of my bed and skipping to my workroom as soon as my housework has been done.
Here is a project I finished a long time ago, but forgot to show you. I got into crocheting by reading the fantastically colourful blog attic24. Lucy is a real gem; very creative and generous. Her blog has a sidebar full of crochet tutorials, many of them really beginner friendly in that she photographs the different stages of making and points out where to put your hook etc.

This is the granny stripe blanket from her sidebar. I did the edging from my own head, as I had gained some unwarranted self-belief in my crocheting skills. It is essentially just triple stitches, just like the blanket. The only adjustment was that on the long side I only used two of them in each space between the clusters. I had to unravel it a few times to get it right. Looking at the pictures you see that the edge is wavy because it still has too many stitches. I should have thrown in few places with only one stitch.

I like the white framing it brings lightness to the blanket. I was not too sure about my skills and whether I could actually take this project to its end, so chose reasonably priced (read not 100% wool) yarn. Lucy had mentioned the Stylecraft yarn on her blog and I decided to try it. It is nice enough, not as sumptuous as a full merino wool yarn, but hey, certainly nice and snugly. (And the price is not quite as painful).
It took me four months to make it. Mostly sitting and "watching" telly or at the swimming pool when Elf son was still having lessons. But it was addicting pastime too. Just this one row...you know. I loved the ease of making it; there is no sewing it together afterwards, all the ends were tidied as I went along and it was very easy to crochet.

I finished off the blanket with small pompoms. Now if you have children around a word of warning; they absolutely love the blankets and will put their fingers through it. There is no harm in that. But the pompoms, the pompoms. Dear me, it is very difficult not to pull and tuck in them. They were made with the clover pompom maker and secured very well onto the blanket in my mind. Nevertheless, I have done some maintenance today in this part of the blanket replacing many pompoms. Now that the blanket is not a new one, we have actually not had these incidents of pompom murders for a good while.
The blanket resides on our bed, the quilt is one of the things I still have to show to you.

Here are the stats to help you if you should wish to make one too:
166cm X 136cm
Weighs 1277gr
441 stitches on the foundation chain.
Stylecraft Life Dk yarn in seven colours: White, Zing, Clover, Cardinal, Fern, Fuchsia and Cobalt.
4 months in making at a leisurely pace
Great to snuggle under!
Sunday, 20 January 2013
Baby Quilts

I have made several of these in different guises. They are relatively easy to make and I can often use fabrics I already have, although I also buy a bit to make them extra special. The quilts have become my default go-to gift for new babies as they have been very well received. Several recipients have very sweetly commented that the quilt has been the nicest gift they have got for their baby. (Or maybe I am really quick, before there are too many to compare with???)
Here are more pictures from little A's quilt. I used the "Chinese Coin" quilting, but did not make the coloured bits equal in their length. It is a really easy way to quilt as there is no need to sweat over the block corners to fit. This is possibly the easiest quilt type ever!

The quilt was for a "yoga baby" and I got the birth details from the Mum without even being sneaky. I just had to keep them in my head during the session, so I could embroider them as soon as I got home!

This second one was made before the baby was born and we did not know about the gender. The quilt was made of big squares of white and printed cottons.

The back was some of my last bits of hand dyed batik polka-dots from Africa.

The colours were rather light and sort of retro feel to them. It felt like a spring baby quilt. This one I quilted along the piecing lines.

Friday, 18 January 2013
Cleaning the Hut part 1

I am sure that I am the last one to get on the cheap/environmentally friendly/home made cleaning stuff. The web seems to be full of recipes for different concoctions, so I thought that I will show you what I use at the moment, just to add to the general merriment! My cupboard gets edited if I find better stuff. On the other hand, if something works I seldom bother seeking alternatives. It is more that I might stumble on a bright idea on my internet journeys.
I plan to wash our clothes in washing powder made of :
2 part soap flakes or grated soap
1 part or borax
1 part of soda crystals
I need approximately 2 tablespoons of this per wash. (I have a big 9kg machine).
I did a test run or two. It worked beautifully and now I am working through my stash of shop bought detergents. You could add an essential oil into the mixture if you want a scent. Our family is happiest with unscented stuff in general.
I am really, really excited about dishwasher powder I have been making and using
1/2 part borax
1/2 part washing soda
Little squirt normal dish washing liquid
White vinegar for rinsing.
I use maybe 1-2 tbs of the powder per wash.
If you have a grim shower screen, here is a whopper:
Make a paste of water and flour. Any flour does it; corn, potato, wheat, as long as it thickens the sauce. It doesn't need to be awfully thick, aim at a cream cleaner consistency. When the sauce is thickened and hot, add some white vinegar. Now spread the paste on your grim shower screen and wait. Go on, have a cup of tea or go and clean something else. If it is really bad, you might even want to leave it overnight. Then you just rinse the thing away with the help of a sponge. Voila, shiny screen!
One thing I have not really found is a dish washing detergent I could make. I am well aware of that you can use washing soda to this end, but that means using rubber gloves all the time. What I need is a gentle enough for hands, but enough oomph to get the grease off the pans. At the moment I am using a commercial eco-friendly product. Any ideas?
PS. The picture does have very little to do with the post apart from the fact that I often wear an apron while cleaning and always when cooking and washing dishes. My aprons get a lot of use and look disgusting after being used for a year. The one above was a Christmas present to my mother-in-law.
Subscribe to:
Posts (Atom)