Wednesday 30 January 2013

Keeper of memories


Keeping things, de-cluttering, mementoes...That is all very topical for many of us, judging by the blog posts I have read recently. I think of myself as quite a good at de-cluttering. But that does not mean that there is not room for improvement.

I think that even for a hardened de-clutter some things are more difficult to let go than others. That is gifts or things from people who mean a lot to us. I think if the person who gave the thing or owned it first is also dead, it becomes even harder.

I read a very moving posting about a blogger (in Danish) who realised that she had been hanging to a bowl which she had got from one of her grandmothers. This was the only thing she had from the lady, who had passed away. The bowl never really fitted into her house and was difficult to store due to its size. Recently she realised that her memories of the wonderful grandma were not dependent on the bowl; she had them and nobody could take them away. Neither was there a little bit of grandma magically hiding in the bowl, so she decided to let it go.

I have had similar experiences and have been able slowly to let go of things I would never use. Now...I am going to up the game a bit for all the crafters: What do you do when you have a piece of beautiful handiwork, which does not get used? For me it is far, far harder to let go of something if it was made by my grandma than if it was merely bought and used by her. So I have a bit of a textile treasure problem: What to do when you are not going to use it?

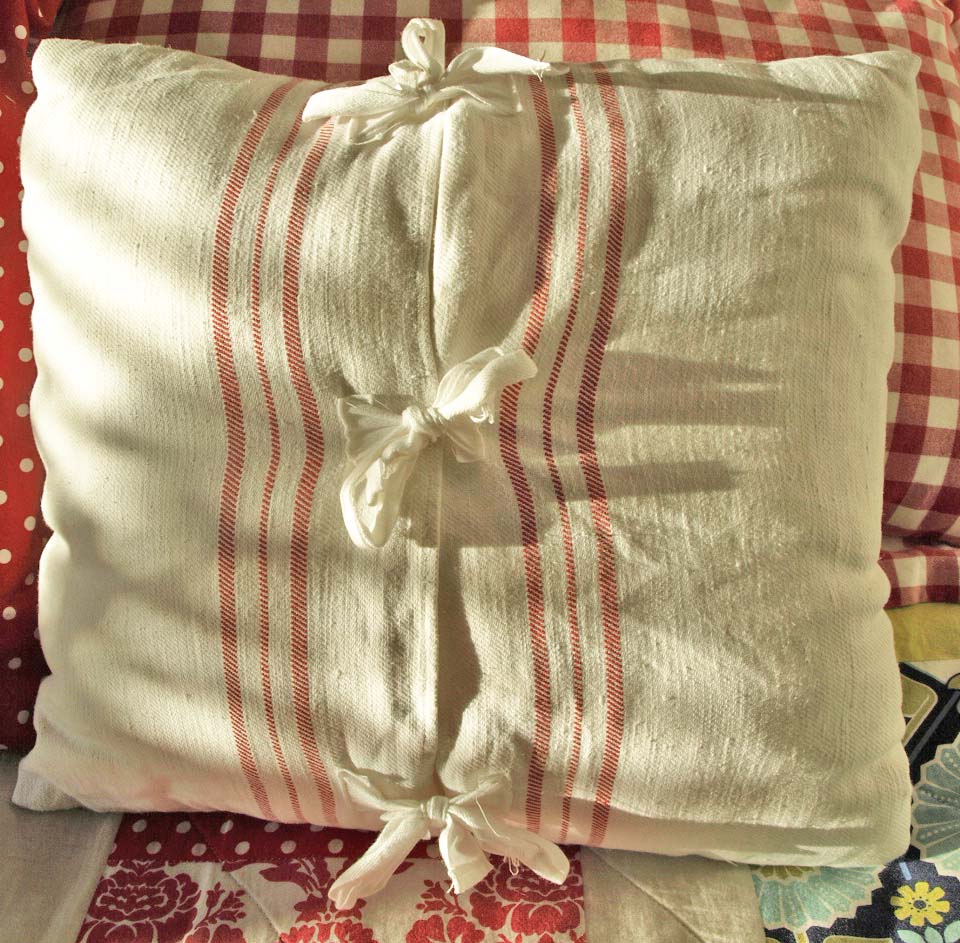
This is what I have done lately. I have tried to think of an alternative use for the material. Here is a cushion I made out of a dishcloth. Ok, it might not be the height of refinement, but the linen it is made of is quality you will have hard time to find today. (Hence I cannot bring myself to use it to its original purpose!).  I had one of those days when I really yearned to make something in hand, so both the patchwork and embroidery is entirely hand sewn.


The original monogram is intact and beautiful


The back got tied in a primitive style echoing the loop the teatowel used to have.


These cushions have been made by my relatives and are now mine. They were cushions and I like them as that. The black one used to be on my greatgrandmother's bed. It is either made by her or my grandmother, I do not know for sure. It is actually made of old suiting, the back shows it clearly, having been put together from either leg or arm of a suit, probably to get the last use of expensive fabric. I use it even if the embroidery has started unravelling as you see in the first picture of this post. I rather use and enjoy it than "archive" it in a cupboard.


 I had also a sateen apron with beautiful embroidery of my grandma's. I knew I would never use it, but could not make myself to throw it away either. So now it is a sofa cushion.


As the apron had a little pocket, I attached that on the black cotton back of the cushion to remind me of the apron.


Have you re-purposed treasured things lately?

Tuesday 29 January 2013

Juicy baby quilt


This was the other reason why I was so quick out of my bed last week; a baby quilt commission in juicy colours.

It is again the "Chinese Coin" model and measures approximately 105cmX117cm. The front is pieced from various quilting cottons and the back is flannel.


I machine pieced and quilted and then finished off by hand sewing the binding on the back. This time I quilted with a wavy free motion in yellow. I like the result.
 

The dedication patch is also hand embroidered and sewn.


I can hand quilt and quite enjoy it, but I cannot see that you can sell those pieces, if you want to have a salary for yourself. Or I should find some very wealthy clients for those ones...I guess for me they will always be pieces made for my family and friends.

Sunday 27 January 2013

Bunny Baby


Who is napping on my bed?

Oh it's you! This Bunny Baby was made as a commission and was obviously needing a rest before its long journey to Canada.


The idea is an old one;  dolls with soft bodies and plastic face and sometimes hands have existed long. I have replaced the plastic bits with Waldorf type head and hands. In Maricristine Sealey's book "Making Waldorf Dolls" she shows something similar, but not quite the same. This is naturally my own pattern.

The animal ears are also a used theme.  I can remember seeing at least bunny ears and teddy ears on bought dolls. I offer choice of bunny, mouse, teddy, cat and "beagle" ears. You can have the baby without ears as well. It looks quite sweet with a pointy hood instead.

This is the doll which is more suited for a younger child. Very young children like to cuddle soft toys, throw them about, cart them around in buggies, bags and buckets. There is none or almost no interest in changing clothes for a dolly. To start with the fine motor skills won't allow for this anyway.


The doll's face is made from the same skin fabric, 100% cotton interlock jersey, as the other dolls. The features are embroidered as are the wisps of the hair to make the dolly more durable and safe for the smallest. It would be quite an experience for a little one who is still in his/her mouthing period to get a mouth full of mohair yarn. It is possible to make a little fringe of cotton, but it is not as durable option as the embroidered one.

 The filling is sheep wool, just like the other dolls. And as I just cannot make a doll without ANY clothes, she got a little skirt on. It has an elastic waist, so it is an easy "starter" piece of clothing both for taking off (which happens first) and putting back on. A Boy Bunny would wear elasticated short trousers.


The Bunny Baby is wearing a onesie made of high cotton content velour in colour choice of the customer.

This Bunny Baby ate lots of food before the travel, so her tummy is nice and round. She is ready for hugs and cuddles with her new dolly mummy.


She needed something to travel in apart from the normal packaging, so she got her own tote to travel in comfort.


Have you made anything inspiring for the younger children?

Thursday 24 January 2013

Crocheted cosiness


I am not able to churn projects at the pace I am posting them, but  I have some backlog from the last year. This week I have actually finished two commissions, which I will show you later. I have been hopping out of my bed and skipping to my workroom as soon as my housework has been done.

Here is a project I finished a long time ago, but forgot to show you. I got into crocheting by reading the fantastically colourful blog attic24. Lucy is a real gem; very creative and generous. Her blog has a sidebar full of crochet tutorials, many of them really beginner friendly in that she photographs the different stages of making and points out where to put your hook etc.


This is the granny stripe blanket from her sidebar. I did the edging from my own head, as I had gained some unwarranted self-belief in my crocheting skills. It is essentially just triple stitches, just like the blanket. The only adjustment was that on the long side I only used two of them in each space between the clusters. I had to unravel it a few times to get it right. Looking at the pictures you see that the edge is wavy because it still has too many stitches. I should have thrown in few places with only one stitch.


I like the white framing it brings lightness to the blanket. I was not too sure about my skills and whether I could actually take this project to its end, so chose reasonably priced (read not 100% wool) yarn. Lucy had mentioned the Stylecraft yarn on her blog and I decided to try it. It is nice enough, not as sumptuous as a full merino wool yarn, but hey, certainly nice and snugly. (And the price is not quite as painful).

It took me four months to make it. Mostly sitting and "watching" telly or at the swimming pool when Elf son was still having lessons. But it was addicting pastime too. Just this one row...you know. I loved the ease of making it; there is no sewing it together afterwards, all the ends were tidied as I went along and it was very easy to crochet.


I finished off the blanket with small pompoms. Now if you have children around a word of warning; they absolutely love the blankets and will put their fingers through it. There is no harm in that. But the pompoms, the pompoms. Dear me, it is very difficult not to pull and tuck in them. They were made with the clover pompom maker and secured very well onto the blanket in my mind. Nevertheless, I have done some maintenance today in this part of the blanket replacing many pompoms. Now that the blanket is not a new one, we have actually not had these incidents of pompom murders for a good while.

The blanket resides on our bed, the quilt is one of the things I still have to show to you.


Here are the stats to help you if you should wish to make one too:

166cm X 136cm
Weighs 1277gr
441 stitches on the foundation chain.

Stylecraft Life Dk yarn in seven colours: White, Zing, Clover, Cardinal, Fern, Fuchsia and Cobalt.
4 months in making at a leisurely pace
Great to snuggle under!

Sunday 20 January 2013

Baby Quilts


I have made several of these in different guises. They are relatively easy to make and I can often use fabrics I already have, although I also buy a bit to make them extra special. The quilts have become my default go-to gift for new babies as they have been very well received. Several recipients have very sweetly commented that the quilt has been the nicest gift they have got for their baby. (Or maybe I am really quick, before there are too many to compare with???)

Here are more pictures from little A's quilt. I used the "Chinese Coin" quilting, but did not make the coloured bits equal in their length. It is a really easy way to quilt as there is no need to sweat over the block corners to fit. This is possibly the easiest quilt type ever!


The quilt was for a "yoga baby" and I got the birth details from the Mum without even being sneaky. I just had to keep them in my head during the session, so I could embroider them as soon as I got home!


This second one was made before the baby was born and we did not know about the gender. The quilt was made of big squares of white and printed cottons.


 The back was some of my last bits of hand dyed batik polka-dots from Africa.


The colours were rather light and sort of retro feel to them. It felt like a spring baby quilt. This one I quilted along the piecing lines.


Have you done any nice quilting lately? Big or small...(These are not especially big pieces, but big enough to be used for toddler naps and later maybe as lap quilts).

Friday 18 January 2013

Cleaning the Hut part 1


I am sure that I am the last one to get on the cheap/environmentally friendly/home made cleaning stuff. The web seems to be full of recipes for different concoctions, so I thought that I will show you what I use at the moment, just to add to the general merriment! My cupboard gets edited if I find better stuff. On the other hand, if something works I seldom bother seeking alternatives. It is more that I might stumble on a bright idea on my internet journeys.

I plan to wash our clothes in washing powder made of :

2 part soap flakes or grated soap
1 part or borax
1 part of soda crystals

I need approximately 2 tablespoons of this per wash. (I have a big 9kg machine).
I did a test run or two. It worked beautifully and now I am working through my stash of shop bought detergents. You could add an essential oil into the mixture if you want a scent. Our family is happiest with unscented stuff in general.

I am really, really excited about dishwasher powder I have been making and using

1/2 part  borax
1/2 part  washing soda
Little squirt normal dish washing liquid

White vinegar for rinsing.

I use maybe 1-2 tbs of the powder per wash.

If you have a grim shower screen, here is a whopper:

Make a paste of water and flour. Any flour does it; corn, potato, wheat, as long as it thickens the sauce.   It doesn't need to be awfully thick, aim at a cream cleaner consistency. When the sauce is thickened and hot, add some white vinegar. Now spread the paste on your grim shower screen and wait. Go on, have a cup of tea or go and clean something else. If it is really bad, you might even want to leave it overnight.  Then you just rinse the thing away with the help of a sponge. Voila, shiny screen!

One thing I have not really found is a dish washing detergent I could make. I am well aware of that you can use washing soda to this end, but that means using rubber gloves all the time. What I need is a gentle enough for hands, but enough oomph to get the grease off the pans. At the moment I am using a commercial eco-friendly product. Any ideas?

PS. The picture does have very little to do with the post apart from the fact that I often wear an apron while cleaning and always when cooking and washing dishes. My aprons get a lot of use and look disgusting after being used for a year. The one above was a Christmas present to my mother-in-law.

Tuesday 15 January 2013

The three sisters


These two are now ready to travel to their new home.
Their little sister here did go earlier.


Isn't she cute? She is the youngest sister of the three I made. I have a friend who commissioned three dolls from me, one for each of her daughters. She is adopting the youngest one and is giving each of the girls a Waldorf doll with their features and favourite colour clothes. The picture is courtesy of my husband. I didn't get to take more pictures of the "baby" as she travelled to her new home earlier than the older ones.

I love to make these dolls as custom made orders. They become so special because I think about the child and their personality while I am making the doll with care and love. The dolls are obviously not strictly traditional Waldorf dolls, I play with adding features like eyebrows and sometimes dimples. My dolls are also in sewn clothes rather than in knitted ones. I do though honour the idea of natural materials. They are filled with sheep wool, which makes them really lovely to cuddle. Everybody wants to hold them, children and adults alike. This baby has actually also a knitted jumper she took home with her.

Now, let me indulge in the pictures of the two older sisters. Here is the oldest sister posing in her dress. Don't be fooled to think that she can stand. She is cleverly supported from behind, hence the sightly odd pose.


She can wear her boots up long and her warm sweater and be ready to go anywhere!


She has a lovely messenger bag and nice wooden bead bracelets.


 Here is the middle sister in her dress. She likes clashing colours.


She too has a sweater and a bag. And a very curly hair!


Her bag is keeping the dress safe on the way home.


The sisters do like each other.


And then for the unashamed self-promotion: Would you like to order a doll like these? I am open for orders and will send worldwide. I take payment through PayPal. You can email me for prices, if you are interested. I also make boy dolls and dolls suitable for younger children (0-3).
As the dolls require quite a lot work, you need to allow 4 weeks for making of a doll. (I might be quicker, but as a caution do calculate with 4 weeks as a standard). I would love to hear from you!

Sunday 13 January 2013

Soap making


I was encouraged by a friend to try my hand at soap making. I was very doubtful about her assessment: "It's really easy!" I went to read about it on Rhonda's excellent blog and decided to try. I followed Rhonda's instructions for the olive soap. The result was OK, although not excellent. The fail is not necessary in the instructions, I had a very inaccurate set of scales that might have more than anything to do with the result.
By then I was determined to make some soap I liked and borrowed a book the local library. I cannot even remember the title, but honestly, any book on the subject would do and the net is heaving both with recipes and instructional videos. The most important bit of the making is to get the proportion of lye and oil right. There are a number of good lye calculators on the net and I use this one.

I am not entirely sure if I should confess what I did next...my Hubbie had been making chips and afterwards wondered about the waste of the oil. (Of health reasons we won't re-use). He then aired the thought of filtering the oil and using it in soap making. I must say that this soap was purely meant to be for cleaning and the oil had only fried potatoes, nothing else and it really did not have bits in it when it went into the pot. As the other ingredient, lye, is not expensive I decided to try. I think I added a smidgen of coconut oil, just to add some lather. You know what? It worked. We have been using this soap quite happily. Even my sister was gifted some and really liked it. Although I did not reveal the story before she had used it...I did not want to gross her out.

I did make a batch of soap for Christmas presents. If you received some you can be safe to use it without looking for potato bits, I used oils directly from the bottles! This time I wanted to make it a bit special and extracted some goodness out of Calendula petals into sunflower oil on my windowsill for some weeks. I then used the oil in the making of the soap. There was also a bit of coconut oil and some dried Calendula petals added and some lavender oil for scent. This soap is very good for anybody with dry skin.


 In general the home made soap, like the posh hand made ones from the health food shops, are far superior to the industrially made ones. It is such a delight to use it. Because all the ingredients of the nice oils are left in the soap, it is not as harsh for your skin. I understand that in the industrial process glycerin is extracted first as it is more valuable to sell as an ingredient to the cosmetic industry. It is actually quite an eye opener to look at the ingredients list of even a good soap from the supermarket shelves. Something which should have very simple ingredients has suddenly an arm long list. I leave you to draw the conclusions. I can wholeheartedly recommend making your own soap, it is really easy! (Just the common warning, do not attempt while you are having small children or pets around).

Wanting the present would fill somewhat more I also gifted a facecloth with all of my soaps. They were made as described here.


I did produce more than the pictured ones, just did not take photos of them all.


I have reports from my giftees (not a word, I know) that they love the soap to that degree that they would like to receive more when they have used up their lot. Hmm...I think I'll send the recipe. 

My soap recipe for my Christmas Soap:

1000gr sunflower oil
250 gr coconut oil
172 gr lye
450ml water

Some of the sunflower oil was infused with Calendula. I added maybe 5ml of lavender oil and the Calendula petals when the soap had reached trace.If you really want to scent your soap, prepare to use considerable amounts of essential oils. This also explains, why only certain oils are used; you better use something with distinctive and strong scent and at the same time it needs to be one of the affordable oils. In our household we honestly prefer unscented cosmetics and detergents.

I won't write how to make the soap as the process has been described so many times...you could start at Rhonda's blog, it has the recipe/process button in the side bar.

Friday 11 January 2013

Christmas present review part 2


The picture is not one of the presents, but some home made decorations. I noticed that the blog land was awash with "paper jewels" and everybody seemed to have their own version of them. I downloaded some patterns here and used white card with different coloured and patterned papers clued to it. (The site is total bliss for someone wanting to do paper crafts...)When I started I thought that I would not be able to make them and if I could, I would not really take to it. It just looked too fiddly. Well...the ones in the picture are by no means the only ones I made. I just could not stop making them. It was truly addictive and I had to try all sorts of combinations of red and white. They were hung in our tree and are now carefully packed away for the next Christmas.

I also made mini bunting for our tree. It was really easy. I cut the flags as diamond shapes and just folded them and sewed them on the hemp line with zig-zag. In this way the bunting works from both sides. I cut the fabric with pinking scissors to avoid hemming. It also makes the little flags look rather decorative.


Here it is on the wall behind our bed before the tree went up. I almost left it there, because  it looked so festive and cheerful. When the tree came down I was debating whether to keep it for decorating all year round, but decided not to.  There is something very special about things which come up only once a year. I might though produce something similar in other colours...


So now to the presents. The bags galore were made. Two more wash bags were made for twin nieces R&L. They have started to have and go to sleep overs and I thought a wash bag might be a nice thing to have. The inside was made out of same polka dot wax cloth as the bigger wash bag's in the previous post.


They were nice to make until I for no reason hit a wall of "cannot do" with the second of them. I think I spent as long getting one seam right in that as all the other seams put together. Few swear words were uttered...I made a zip tag to ease opening and closing of the bags. I thought the button looked cute on it, do not know how nice it is to use though. The girls can always take the buttons away, if they are too much of a hassle.


I made more bags for others. My sister-in-law got this one. It started as a simple shopping tote, but then I lined it and decided that it needed a rigid bottom. So now she can either just use it as a shopping tote or a BIG handbag.


For our teenage niece the bag was made from a wilder fabric. Luckily she liked it, as it admittedly was a gamble. I thought she might, but was also prepared for the "what on earth does she think of me" -reaction.


I made it big and strong enough to use as a school bag for the college and this is what she is using it for. I am relieved.....

Did you take a chance making surprise presents? Link in comments, I would love to see!