Friday, 31 December 2010

A Bag and a Loose End


   Have a Happy New Year, Dear Readers! 
 Wishing You a Creative 2011 with my last post for 2010
Love from Mama Elf

After the Christmas there was delicious time to use to sew. The countless projects in my mind were all put in an imaginary pot and one was drawn from there as a winner. Make a bag for myself! I had planned this since August, when I visited Marimekko factory outlet during their big summer sales and acquired some materials. I wanted to replace my old Marimekko shoulder bag by something more colourful. As I wanted the bag be rather sturdy, I chose to buy canvas from IKEA for the lining. First I could not get the lining and then the publishing date of Lisa Lam's book "Bag Making Bible" was delayed. I did not plan with the book from the beginning, but saw some pre-reviews and thought that it would be stupid not to wait. And then came Christmas.

I was debating with myself whether to adjust the pattern slightly, make it just a smidgen smaller..but then I thought: for once woman, just do as it says in the book. Follow the instructions and learn. So that is what I did, largely...
I did go with the instructions and I have chosen a white lining, as I am tired of losing things in dark bags. Whether it will look awfully grubby in no time is another question. This is how the bag looks inside. I took the picture during the construction to give you a better idea:


I added the little pocket above the pencil pocket. The owl fabric has been in my draw for a while and I had used some of the fat quarter, so the remains were used very carefully. The pattern included the pocket with zip, but letting the lining encircle the zip was my own idea. I thought it looked really cute and I also added that pull with an owl for the zip.


The other side was meant to have a laptop harness, but I seldom lug my laptop around, so I did not bother. I made a big pocket/divider there instead.

This is my first homemade bag ever to have this much metal hardware on it, adjustable strap and square d- rings for the strap


the twist turn locks on the flap


I am proud of my top stitching here. It was made with special top stitch thread and needle. You probably have known about this for yonks, but I have first recently found out about the possibility to buy this product to re-produce something akin jeans top stitching. I was kicking myself that I did not notice to lengthen the stitch when top stitching the shoulder strap. As you might know I love my sewing machine and one of its lovely features is that it can make up to 6mm long stitches.

In the end I was well pleased with another NEAT product from the hodge-podge seamstress.


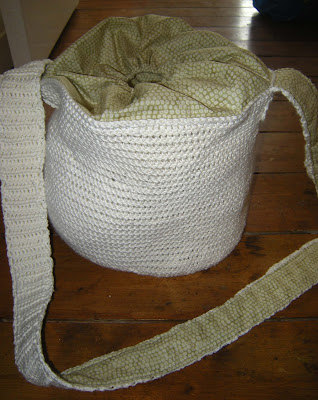
The loose end I had was that I showed in last January the beginnings of a crotchet bag. It was finished and this is how it looks:


It's mostly used to house my yarns, but gets an outing once in a while in the summer.

Thursday, 30 December 2010

More showing presents while we are sniffy, wobbly and throatachy


She has gone mad you might think....posting several posts a day after leaving the blog occasionally for a month. There is an explanation: Christmas has been spent having my two boys' faces in various shades of gray, sniffing, coughing and sneezing. Until this morning I did brilliantly - not a symptom in sight. Now I have a sore throat and very wobbly limbs. I have my hopes up that a day's rest will work wonders and that I am feeling all shiny and new tomorrow morning. Meanwhile I have been putting up my blog roll, although I must admit that in reality it is longer. These are however the blogs I visit most frequently. I might well add a few, as I notice that I have forgotten some "oh so important ones".
I even had a look at some other designs, but none took my fancy, using the blogger has its limitations, but it's free and free is good in my book.

Here is the apron I made for Elf husband, as he is the bread baker in our family.  Can you see the D-rings for the adjustable strap? They are actually two key rings, which I sent the husband to buy in town before Christmas without telling him what I intended to use them for.


I gave him the River Cottage handbook for Bread, which has been a hit. If you like to make real bread and maybe dream of building a little bread oven in your garden, this is your book. It is the best bread book either of us has ever read. In addition it is really pleasing to hold being "book sized" and hardcover with old fashioned texture to the cover. Should I now add that I like the scent of new books and shoes?

I have to tell you that we have aprons in our house, but I have abused them with bleach and paint and varnish and you name it...This time we keep the nice one(s) for cooking only. (I have the fabric ready to make a new apron for me too).

Pencil Cases


These were really good fun to make, the fun consisting of getting the gist of how they are made, producing them satisfyingly quickly and getting rather neat results. (A novelty for a hodge podge seamstress).  I borrowed the way of making from Flossie Teacakes from her little make-up bag tutorial. When I was leafing through Lisa Lam's "Bag Making Bible"similar instructions were found. I altered (as usual) the pattern to be longer, so the pens would fit. Our nieces and my sister got these. My sister got one of the prototypes, which was too short for a pencil case to use as a make-up bag. The nieces had some pencils and pens thrown in as well.

The zips got added a little pull:


and the lining was another colour. The birds had nice seed pods on green, the orange bag had polkadots on orange and the brown one some nice stripes. The fourth one can be seen here as it was the only picture of the insides which did not shake totally out of focus:


I must admit, that in my eagerness I made a couple of them stiffened first with TWO layers of canvas inside and then just one. Did not work, so don't try. It really needs a proper interfacing. I was SO sure I had some, so I had not got it from the fabric shop, but none could be found, when I came home. This propelled me into a tidying frenzy of my materials and in the last, and very deep draw, of my Victorian chest holding my sewing and crafting materials was the said interfacing hiding! I took it as a bonus that I was forced to use a couple of days exploring the deep, deep guts of my chest of draws...

I put some homemade cosmetics inside my sister's and the teenage niece got hers on the side. My sister got the organic rose-water face water, which I use myself as it is lovely relief in these skin drying times. For the teenage niece I produced a facial cleanser/face water from rosewater and some oils. Nothing too exciting, but a nice gift idea for those who prefer natural products.

Wednesday, 29 December 2010

A Jester's Hat


This was meant to be a Christmas present for Elf son. In these pictures he is wearing the hat with a balaclava under it as it was really windy that day.

Luckily I constructed it a day before the winter began in the late November. As the snow started to fall for real, I decided to give the hat to Elf son immediately. It was no time before it looked like this around us. ( I am sure you are well tired of snow pictures now, just jump over...)


The hat is made entirely of fleece and I made the pattern myself. It even involved using Pi calculating some of the measurements. I was really proud of this fact, which just reveals my exceptionally bad maths. I took from beginning to finish just a couple of hours, so if you use a pattern, you could be done in an hour.


Making the hat from fleece simplifies the process a lot: it doesn't fray, it gives a little, but not enough to requite stretch stitch and it stays put. All in all very forgiving and an ideal beginner project. If you are a beginner, you are forgiven to think that I am mad. It really is far easier than you might think. Any mistakes or miscalculations are easy to put right without too much of altering.

I have it in my mind to make the pattern available here as a PDF file and write instructions how to make it, if people want to have it. If you have sewn before, you might just need to see my pictures to figure it out. Elf son wanted to have "streamers" in the back, like his hat from Lapland had:


I would have preferred a dark gray with the red, but unfortunately I could not get fleece in that colour. I used new fabrics, but this could easily be made from an old thrifted fleece jumper as the pieces are small. I can see in my mind's eye many a variation from the theme: using one colour, decorated with ribbons and buttons on the bit going around the head, multi coloured...bells anyone? Elf son's hat has been used a lot, as the snow is still on the ground, although it looks as if it is going and this will soon be just a nice memory:,

More Hearts and a Quilt


So now the pressies can be revealed! This is another decoration I made around the heart theme for my sister. It can be hung on a door or wall or between door jambs. It was not made too heavily in Christmas theme as I thought that she might want to use it other times as well. Maybe as a lucky charm around the Valentine's day?


The other sister's baby got his quilt after a looooong wait. As my sister requested a white one, that's what she got. It was not the most inspiring thing to make in my mind and in the beginning I had the idea of hand quilting it...well, that plan was abandoned. It still has the central bits and some of the panels in hand quilting, but the rest is machine work. Basically anything curved was done by hand, because I am rubbish at free motion sewing on machine. I need to practice it more.  It was washed several times to get the required wrinkly look. I embroidered the baby's name and birth date on it, with white. How nice am I? Well, my sister did not even notice the name. I hope she has found it now. As you might expect the pictures of a white quilt are impossible to take, so here is a white wrinkly thing


and here is a hint of the name embroidery, just take it as an extra competition, "who can spot it?"


More gifts to be blogged about and I have already managed two projects after the Christmas despite the fact that every major electrical item seemed to die in this house over the holidays. That is a slight exaggeration; only washing machine, tumble drier, toothbrush, car battery and the coffee grinder. The last one clearly being the worst...luckily we still own the manual old fashioned grinder as well.

Wednesday, 22 December 2010

Merry Christmas!


Here is my gingerbread house this year. In my book I have cheated as I bought it as a kit from IKEA. Last year I did the same and it collapsed! My homemade one year before the last did the same, although my technique with melted sugar has improved since. I burnt myself only once today instead of having fingertips covered in blisters.

Pre-made kit route was chosen as I cannot bear the thought of going to all the hassle of making the house, which ends up in ruins as soon as I turn my back to it. I think that last year's disaster was due to using far too heavy sweets as decoration and just possibly the air humidity in this country.

We will see how this ends. The pictures are just a way to wish you lovely holidays, if I should not pop back before then. I have an excitable 8-year-old in the house, so entertainment is required. I thing I might even chase a few dust bunnies out of their hiding before Christmas, although that does not count as entertainment.

Monday, 20 December 2010

Life's Little Luxuries


I love the feel of newly washed and ironed sheets. I am not that hot on ironing them, but I love the result, so I do it anyway. I always think of it as "buying" a luxury, when I am using my time ironing.
On my recent trip to IKEA I found new bed sheets for us. I had eyed them in the catalogue, but did not want to set my heart on them before I had seen them in person. They were just as I imagined. They are obviously machine embroidered, but I just love the red work on them.


No trip to IKEA is completed without a quick look around in fabrics department and this time I brought back the gingham, which I wanted to make to pillowcases to go with the new sheets.


We don't really sleep with two pillows, it's more so I can have some eye candy. The husband and son read the goodnight story on our bed and neither had noticed my gingham pillows, even though they were lying on top of them. My cousin says that this is normal male behaviour. He claims that he won't really notice any changes, which his wife has made at home unless she has moved the fridge or his bed. Well, at least I am free to do as I please with my home decorating and that is another lovely luxury!

Sunday, 19 December 2010

The Elf


For many years our tree has been decorated in silver and white. It has been pretty and I have enjoyed it. Last year I started hankering after a more "homemade" tree, bit more Shaker style or even Scandinavian style. (That is what Scandinavian style means in my head, no official way of decorating in Scandinavia). After last Christmas I bought some straw decorations from IKEA for very little money and I already had some cute wooden decorations and couple of other bits and pieces.


A bit of gingham ribbon was added with elves from IKEA's this year's collection and my homemade hearts and voila, I had the tree of my dreams.


As my boys were so accommodating for my new scheme and did not kick up too much fuss about all the glitter lacking from our tree, I decided to go for an opinion poll for the tree topper. (I should add here that the discussion about lametta is conducted on a yearly basis in this house). Opinions asked: one, the Elf son's. I told him that I didn't much care for our rather overly sweet fairy bought from B&Q and would like to make a home made one and what did he think about that.  He had an instant reply: I don't want to have a fairy, I'd rather have an ELF! So this is what I made:


I had absolutely no idea how to make one. It was rather "let's see where this takes us" affair. I am delighted by its stability on the top of the tree. All the toppers I ever have had to handle were wobbly one way or the other. And it is a truly homemade decoration. It is mainly made of felt and the stripy arms and legs are made of the last bits of Elf'son's much loved stripy t-shirt from when he was 4.  My plan is to make some more homemade stuff every year, how I am going to fit it all on the tree, I don't know. I guess some of it gets too worn out or I will replace some of the bought stuff. Have you had any last minute making for your tree?
Editor's note: The long exposure tree picture and the proper, sharp picture of the elf are taken by the Elf Husband with his SLR, as my camera didn't quite make it in these low light conditions.

Wednesday, 15 December 2010

Christmas Preparations


There are luckily a few preparations for the Christmas, which are OK to show now. We baked some gingerbread biscuits with Elf son on one Sunday morning. As usual he was eager to help, see the grin:


This is the reason.


Honestly, it's a time honoured tradition that at least 1/5 of the dough ends up eaten before its baked. It is unusually delicious and both young and old keep snatching bits from it.

I did not take any pictures of the result as my mojo left me after decorating only three biscuits. And guess what? We have already eaten all the ones we baked. There just might be more baking in the cards.

This December I have had red, polka dots and hearts on my brain, so I made these for our tree. I love how they feel in my hand. The felt was really nice to work with in this type of project as it doesn't unravel and  is easy to make to relatively small and tight forms.I found some vintage cloth covered buttons for these, which pleases me to no end.


Elf Husband gives little gifts to the ladies who work under him every Christmas. It tends to be my job to put the gift together after he has decided what type of present he would like to give. As there are 10+ people, they cannot be expensive. This year I put this together: (Angel not included)


You probably don't need any explanations really, but here are the few technical bits, which are worth sharing: The candle is raised a bit and blocked to the position with florist's oasis, which also holds the greenery. Should you use satin ribbon like me, it has tendency to slip off the pot. I solved this by rolling a bit of masking tape under the ribbon in the back and on both sides of the bow, as I didn't have any double sided tape. I tried earlier with a hemp string and that sat without help. The pine cones are held in place with a bit of steel wire stuck into them. The hearts are cotton glued on felt, edges cut with pinking scissors and the ribbon sits in between them.
I like this type of things where I can use few simple ingredients to make something nice, but not too elaborate. At Christmas time I especially love the greenery with some colour. Have you made any nice Christmas things?

Thursday, 9 December 2010

Book Review for Sewing People


I find the issue of crafty and sewing books quite tricky. While I generally LOVE books and I especially love a good craft/sewing book, I am not easily pleased. I mean I find most books of this kind inspirational one way or another, but not enough for wanting to own them. Often there are a couple of nice things and the rest don't appeal.  And then there is a category called TREASURES. I won't part with my treasures, I sleep next to them (ok, they are stacked on the floor, I do not snuggle with them). These two books belong to that category. You might already know them, but in case you have not heard of them, now is a good time to add them to your wish list.

Cal Patch's Desing-it-Yourself Clothes; Patternmaking Simplified is good both for beginners and more experienced sewers. It starts with how to take your own measurements and takes you through step-by-step how to create your own patterns for basic pieces.


When you have mastered them, you will also feel confident changing the patterns to make exactly what you wanted to have and it will fit. Or change some ready made patterns to be moreto your taste.


If you are more experienced there are several good tips and techniques to be learnt. (Well, there was and is plenty here for me at least).

The book is visually pleasing, with beautiful photos and nice lay-out.


Cal Patch used to design for Urban Outfitters and Free People before launching her own line of clothing. She has also taught pattern making and sewing for yonks and that shows in clear instructions. She knows how confusing it all can be for a beginner.

Lisa Lam's book "The Bag Making Bible" is just that, at least for me. She is the insanely creative and skillful girl who is behind the blog and internet shop called Uhandbag. She has written eight different patterns into this book, and all of them look good. What actually pleases me most in this book is that it has chapters on different parts of a bag and how to construct them. For example in the chapter on pockets


you can learn how to make a slip pocket, lined slip pocket, bellows pocket, elasticated top pocket and darted corner pocket.

There is also a whole chapter about closures (among other topics, this is truly a bible):


This means that you can dream up a bag and then have Lisa at hand explaining you how to sew the different bits. I need this kind of weekend bag, definitely.


I am looking for the fabric for mine, have not decided as yet whether I want it in canvas or in wax cloth.

The book is absolutely packed with good hints and tips and the pictures are eye candy too. I love bags and clothes, but have my own style and go through periods of intensely liking a colour or certain colours. Combine that with hate of shopping and wanting certain quality and finish in my clothing and bags with limited finances and you start to see why I like these books. That I also adore sewing and creating and get all giddy with it, is obviously a bonus.

Both books have the format in common; there are projects there, but in essence they give you tools to create whatever you fancy. And boy, they do it well!  These books won't be on my list, because I own them already, but I would love to hear if you have any treasures in your bookshelf.

Sunday, 5 December 2010

Teal Jacket


This is my new favourite garment and a very silly "look here I am taking a picture of myself in a mirror" pose. It is made of boiled wool blend. I literally took it from the sewing machine and put it on and we have not been separated but for a day of cleaning. What no whole days of cleaning at yours? Not that I am cleaning like that all the time, but when I am in my creative frenzy the cleaning tends to slip from my mind and we go two, maybe three weeks without cleaning. And then I suddenly notice the dust bunnies, grime in the bathroom, bits on the living room rug. This time of the year elfing business is at its busiest.
We have had lots of snow, so some time has been merrily used in three-way snowball fights, sledging and building snowman.

Anyway, I started off with an Ottobre pattern from 5/2008 magazine. In the end I had adjusted rather a many details and after listing them to Elf husband he said: so you re-designed it. The jacket is unlined and works as a cardigan, but I foresee it being used as a spring jacket too.

First the changes you would not be able to see; I added a layer of fabric to the front opening and collar area to give it a bit more structure and made the armhole considerably roomier. This is my gripe with Ottobre patterns. We seem to have very different ideas of what constitutes an armhole. I got caught in this again and despite making the armhole up to next size, it was not enough, so ended up adding extra ovals under the arms, where they hopefully cannot be seen. I should have made a muslin, I know.

I also changed the front pleats from being scrunched up style to little individual pleats and that pleases me to no end.. The sunshine(!?) during the photo session washed the colours out rather well, so this detail looks almost black and white.


I used the pocket pattern as it was, but did not add the velvet band on the stitching on the pockets. I like them as they are and used a double top stitching instead.


Sleeves were extended to full length and added a cuff. The pattern had 3/4 sleeves, but I find them cold in the winter and I especially loathe them in jackets used outside. I find it is too much of faff to match my indoor clothing, which would be peeping from the sleeve with the jacket.


In the end I also went with two buttons instead of three, just because it looked nicer in my eyes and allows the jacket open to a slight a-shape, which I like.


So here is another shot of the whole jacket, the true colour is the colour of the sleeve and the cuff picture. All the others are despite photoshopping washed out in colours in various degrees.